BHCT 258 PRACTICAL - 2 HORTICULTURE ASPECTS
PRACTICAL - 2 (HORTICULTURE ASPECTS)
ESSENTIAL COMPONENTS OF
HORTICULTURE:
HEDGES: Hedges is a type of boundary by the bushes not by any hard
material.

LAWNS: Lawn is a grass-covered land (very closely cutt grass). Lawn absorbs and holds
water, it prevents soil erosion, trap dust & dirt, provide oxygen.

FLOWERBEDS: It is
always advisable to keep one type of flowering plant confined to one bed or one
set of pots, arranged in a presentable pattern. Prominence is to be given to
one variety while laying flower bed for the lawn/ garden.

SHRUBBERY: Shrubs
are plants with woody stems which are smaller than trees but bigger than
herbaceous plants. A typical shrub will have several stems arising from the
main stem at ground level itself. They can be either evergreen or deciduous.
Some are at-tractive in their foliage, some produce attractive flowers and some
are grown for their attractive berries. A stretch of shrubs are established as
borders on the sides of walks and paths. Shrubs are planted at the corners of
lawn in a curving line. A shrubbery is an area planted with different kinds of
shrubs and a shrub border is one where only one kind of shrub is used.


SOIL:
Soil pH value should be between 6.5 to
7.0.
Soil is too acidic, it will need a
sprinkling of lime and sulphur can be added.
GRASS: Choose a locally adapted grass, which is suitable for that soil.
MOWING:
To
make the grass very short. Grass should be 2.5 to 3.5
inches tall.
WATERING:
Give the water according to grass
type. Water should not be more or less.
FERTILIZING:
Fertilization should be done once or
twice a year.
MINIMIZING
CHEMICAL PESTICIDES: Along with
killing harmful pests, chemical pesticides also kill the soil organisms that
contribute
to a healthy lawn. Use Neem based natural pesticides instead
for best results in Indian conditions. Pesticides having lots of variety in
the market but we should avoid to use these, as it may harm the product and as
well as user also.
Basic Gardening Plans
1.
Choose the right plants for your soil
Before you buy any plants, check your soil type: is it light
and sandy, or heavy and clay? Many plants thrive better in one type than the
other. If you are not sure, look at what plants are growing in your neighbour’s
garden.
2.
Give plants enough space
Do not be tempted by the displays at the garden centre and
buy too many plants for the size of your bed. If you place young plants too
close together, not all will survive or, if they do, they will need more
frequent watering and fertiliser. Crowded plants are also more susceptible to
disease. Plant labels tell you how much room they need.
3.
Be gentle with new plants
If you remove new plants from their pots by pulling their
stems, you are likely to break or bruise them. Instead, gently squeeze the pot
sides and turn it upside-down, using your other hand to catch the plant as it
slides out. Alternatively, place the pot on a hard surface and press the sides
as you rotate it. Again, the plant should slip out when you upturn the pot.
4.
Plan ahead with your design
Before you do any digging, have a think about the big
picture of your garden. Place all of your bulbs and young plants on the soil
surface first and move them around until you are happy with the arrangement.
Then plant them.
5.
Soak your roots
The last thing you want is dry root balls. Thoroughly soak
the roots of a new plant before you put it in the soil. Moreover, make sure the
hole is bigger than the root ball before you attempt to put it in. A plant’s
roots need to be able to spread to get the best chance of tapping moisture and
absorbing the soil’s nutrients.
6.
Label, label, label
For first-time gardeners, it can be easy to forget what you
have planted and where. Take an extra minute to write a plant label (most
plants you buy from a garden centre come with one) and pop it in the ground
next to the seeds, bulbs or plants you have planted.
7.
Water mindfully
Plants are designed to live outside and to draw natural
moisture from the earth without the need for daily artificial irrigation
(unless we are experiencing a drought). As a rough guide, poke your fingers
about two inches into the soil around the plant; if it is very dry, add some
water. The exceptions are container plants, which, because there are a lot of
them in a finite amount of soil, will need regular watering.
8.
Be brutal with weeds
It is important to learn early on that weeds are a
gardener’s worst enemy. Weed regularly and make sure you remove all their
roots. If there are seeds clinging to the weeds, do not put them in the compost
heap; you will end up re-seeding your weeds when you spread the compost.
9.
Give shrubs some breathing room
Resist the temptation to plant your shrubs near a fence or
wall. They grow outwards (in all directions) as well as upwards, so plan
accordingly.
10.
Have fun with it
Allow yourself to experiment and try new things. If you
realise you have planted something in the wrong place – because either it is
the wrong height or colour, or because it is not growing well – you can move
it. Most plants and shrubs, even young trees, can be uprooted and replanted.
Basic Gardening Tools
There are many different types of gardening tools available,
both hand and power operated. You don't have to buy the most expensive tools
available when starting to garden; if you find later that you either don't
need a specific tool, or don't care for gardening as an activity, you will not
have lost a large investment. Later you can upgrade to the better quality
tools, if desired.
Handles:
- Long-handled tools usually offer greater advantage and reach, and often allow working from a standing position. The handle may be either straight or have a D-shaped handgrip on the end. With some tools, such as long-handled pruners, handle extensions may be available.

- Short-handled
tools are lighter in weight, usually less expensive, more compact to store
than the long-handled varieties, and allow one to work efficiently in
confined spaces or while kneeling. Common short-handled tools include hand
pruners and clippers, hoes, garden trowels, and cultivators.

- Handles
are commonly constructed of wood (requires some additional maintenance to
keep splinter-free), fibreglass or plastic (check for cracks), and
sometimes metal (check for corrosion and cracks).
- If a handle or any other part of the tool is damaged or loose, it should be repaired or replaced immediately. Pay particular attention to where the handle fits into the tool for looseness or damage.
Hand Tools:
In no particular order, some of the more common hand gardening
tools are listed below (the same tool may have several different common names).
This is only a basic list, for there are many styles and variations of these
and other tools available to the home gardener.
- Spading
Fork
These have heavy, flat tines and often a D-shaped handle. They are used to
open up the ground, dig bulbs, incorporate soil amendments, and turn
compost.

- Hoe A hoe is used for weeding and scraping the surface of the soil. Garden hoes include the traditional flat scraping/chopping types, along with the newer loop, scuffle or stirrup styles.

- Pitchfork/Manure Fork. Pitchforks and manure forks have long, thin tines which are not as heavy as those on a spading fork. They are used for picking up and moving loose materials.

- Round-nosed
Shovel.
Used for heavy digging and mixing, such as when incorporating soil
amendments or preparing planting holes.

- Square-nosed Shovel. The flat blade allows it to be used to scoop up materials, level high spots in the soil, and cut straight lines through sod and soil.

- Bow or Garden Rake. This is a heavy rake with short, stiff tines supported by a flat or bow-shaped metal frame. It is used for raking heavy materials, removing rocks and other debris from the soil, and smoothing the soil in preparation for planting.

- Leaf
Rake.
A light rake with long, thin, flexible tines designed to gather leaves or
other light materials.

- Garden
Hose.
Used to provide supplemental water to your plants, clean items, and
sometimes to assist in applying fertilizers or pesticides.

- Cultivator. A tool with heavy curved or bent tines, or sometimes multiple spinning blades, designed to open up and aerate the soil. The cultivator styles with tines are also used to mix materials and to effectively loosen weed roots.

- Hand
Pruner.
Used for removing flowers, light-weight foliage, and small branches. They
may have either anvil or bypass blades.

- Long-handled Pruner/Lopper. These are long-handled versions of hand pruners, and provide greater reach and leverage, allowing for larger items to be cut. They may have either anvil or bypass blades, and some of the heavy-duty versions have ratchet mechanisms for additional power.

- Pruning Saw. These are hand saws designed for efficient garden pruning. They may be either a single blade with a handle, or utilize a metal or wood frame. Pruning saws may also be mounted on long handles which allows higher branches to be cut from the ground (these styles often have a rope-controlled lopper in addition to the saw).

- Garden Knife. Useful for cutting twine and plant ties, opening bags, plant propagation, opening up plant root balls, and general garden use. The safest styles have a sturdy fixed blade (often with serrations) which will not collapse on your fingers during use.

- Axe/Hatchet. Axes and
hatchets are used to do rough chopping. Some axes have a double blade,
others a flat end on the head which is used to carefully drive wooden
stakes (not metal, which might make the tempered axe head chip), while
others have a flat, transverse grubbing blade on the head for the removal
of roots (these are called a Pulaski, garden or grubbing axe). Hatchets
are smaller, short-handled versions of axes.

- Clipper/Shears. These are used
to remove a layer of vegetation from the surface of a planting, hedge, or
turf grass. Grass clippers trim turf grass, and hedge shears are used to
shape hedges and shrubs.

- Wheelbarrow/Garden Cart. These are not only used to move heavy and/or bulky materials such as soil, garden debris, compost and plants, but also as portable mixing containers for materials such as soil amendments and even concrete.

- Mattock/Pickaxe. The mattock is a heavy, flat-bladed tool designed to dig or grub in the soil. The pickaxe, with its sharp points, is used to break up heavy or rocky soils. Often a combination tool is found, which has a mattock on one end of the tool head, and a pickaxe on the other end.

Power Tools:
When using power tools read and follow
all use and safety instructions, keep them in good working condition, and
remember that hot surfaces, spinning blades, excessive noise, and thrown
material may cause serious injury to the operator and those nearby. Use eye and
ear protection, and be sure to keep children, other persons, and pets away from
these tools when in use. With electric tools be careful not to damage the cord
or get things wet, and always use and store gasoline and other liquid fuels in
a safe location and manner.
- Lawn
Mower.
These are used to cut turf grass. Walk-behind mowers may be powered by
gasoline or electricity; some power mowers may be either self-propelled or
riding mowers. Power mowers often can be configured to mulch or "grass
cycle" clippings (returning the clippings to the lawn). Large wheel,
heavy-duty versions are available for cutting weeds.

- Tiller/Cultivator. These are used to break up large areas of compacted soil and to quickly incorporate soil amendments. They may also be used to loosen the soil prior to grading.

- Lawn
Edger.
These are used to trim the edge of a lawn or bed.

- String Trimmer. These devices use a heavy string (usually plastic) on a revolving head to trim grass and light plant material.

- Leaf
Blower.
Gasoline or electric, these use forced air to push light material.

- Electric Clipper/Trimmer/Shears. These are often used to trim turf grass, hedges and shrubs. They may use a cord or battery.

LANDSCAPING
(Draw different designs of Landscape in your Journal)
According to Chambers’ dictionary, the definition of landscape
is the appearance of that portion of land, which the eye can view at once and
landscape gardening is the art of laying grounds so as to produce the effect of
a picturesque landscape. Landscape gardening can be defined as the decoration
of a tract of land with plants and other garden materials to produce a
picturesque and naturalistic effect in a limited space. Landscape may or may
not include plants. According to Bailey, Landscape gardening is the application
of garden forms, methods and materials to the improvements of the landscape and
the landscape in this connection is any area large or small on which it is
desirable to develop a view or design.
LANDSCAPING
— Landscape is the appearance of that portion of land which the eye can view at once and landscape gardening is the art of laying grounds so as to produce the effect of a picturesque landscape.
— Landscape gardening can be defined as the decoration of a tract of land with plants and other garden materials so as to produce a picturesque and naturalistic effect in a limited space. So landscape may or may not include plants.
— According to Bailey, Landscape gardening is the application of garden forms, methods and materials to the improvements of the landscape and the landscape in this connection is any area large or small on which it is desirable to develop a view or design.
— Landscape gardening can also be defined as the beautification of a tract of land having a house or other object of interest on it. It is done with a view to create a natural scene by the planting of lawn, trees and shrubs.
— Landscape gardening is both an art and science of the establishment of a ground in such a way that it gives an effect of a natural landscape. It can be also defined as the imitation of nature in the garden.
Natural Elements of Landscape
There are mountains, hills, glens, valleys, seas, rivers, forests, plains, deserts, lakes, swamps, streams, etc. which comprise major part of natural landscape. At certain points, there is harmony between natural elements like ground forms, vegetation and even animal life. The landscape of such place is beautiful and conveys the feeling or mood of the landscape character like exhilaration, sadness and awe. Man has copied the natural elements for improving landscape around him and converted certain areas in the form of garden for his pleasure.
Base plan is developed from the information collected about the site. For base planning process, interviews, site surveys; site analysis and the study of site plan and blue print is collected and a final drawing is made for further process. Landscaping refers to any activity that modifies the visible features of an area of land, including:
1. Living elements, such as flora or fauna; or what is commonly referred to as gardening, the art and craft of growing plants with a goal of creating a beautiful environment within the landscape.
2. Natural elements such as landforms, terrain shape and elevation, or bodies of water;
3. Human elements such as structures, buildings, fences or other material objects created and/or installed by humans
4. Abstract elements such as the weather and lighting conditions.
There are 3 major steps to follow in designing a sustainable landscape design. In order:
1. Bubble Diagrams
2. Concept Plans
3. Draft Designs
4. Landscaping Symbols for Drawings
1. Bubble Diagrams: Bubble diagrams are used to define spaces within the landscape. This type of diagram can be used to present a wide variety of information for the purpose of activities like presentations, planning out designs, and developing strategy.

2. Concept Plans and Lines: At a point when individual bubbles begin to take on specific characteristics, the process enters the concept planning stage. Concept plans are more detailed than bubble diagrams. In a concept plan, the shapes merge to form borders with one another.


There are 3 major considerations in completing the Landscape Design:
1. Principles of Design: It is a process that defines and ties all the individual components of the design together. It includes Simplicity, Variety, Balance, Emphasis, Sequence, and Scale
2. The Elements of Design: it includes Plant type (e.g., tree, shrub, vine and groundcover), Height and width, Texture, Form, Seasonal interest or color
3. Plan View Drawing: A landscape design is completed when the designer has selected the hard-features and plants to fill all the spaces.
Landscape Designing
General
principles of landscaping are as follows:
i.
The ideal landscape garden is like ideal landscape painting
which expresses some single thought or feelings. Its expression may be gay,
bold, retired, quiet, etc.
ii.
Beauty and utility should be harmoniously combined.
iii.
Area should be divided into different parts and plan should be
conceived for each area. Overall plan should be such that the observer catches
the entire effect and purpose of the plan without stopping to analyse its
parts.
iv.
Simplicity of design should be aimed at in the execution of the
plan.
v.
An ideal landscape should have open space.
vi. Let the garden and building merge into each other. There should not be stopping abruptly particularly in front of building. The view of garden from the windows and doors should be very attractive. Planting around the building, climbers against wall and on the porch, decoration of veranda and rooms with attractive foliage, flowering plants, hanging baskets serve to unique the building with garden. Every part of the compound should be planned in such a way that it gives surprising effect to visitor.
vii. Overcrowding of plants and objects should be avoided.
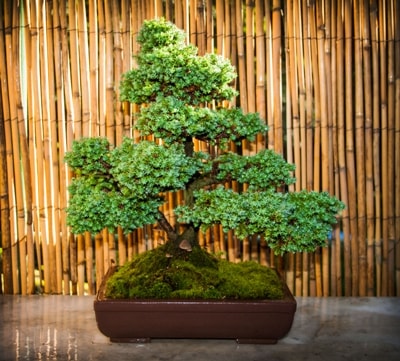
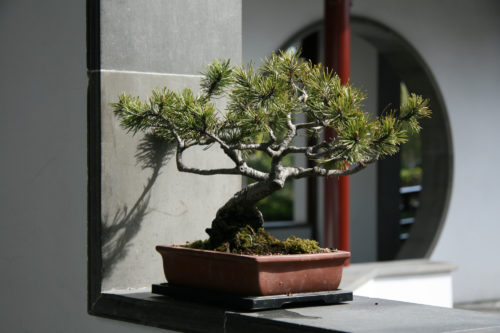
Bonsai
Bonsai, a Japanese art form using
cultivation techniques to prepare a ‘plant in a tray’. It is tree in a
container that mimics the shape and scale of full size trees. In hotels, it can
be used as a part of interior decoration. They can be placed in lobbies and
restaurants and even in the rooms, but has to take care that, bonsai plant has
to be placed in direct sunlight. A Bonsai tree is a replication of nature, in
the form of a miniature tree, without displaying the human intervention too
clearly. The word “Bon-sai” (often misspelled as bonzai or banzai) is a
Japanese term which, literally translated, and means “planted in a container”.
The ultimate goal of growing a Bonsai is to create a miniaturized but realistic
representation of nature in the form of a tree. In other words Bonsai is a tree
or shrub that has been dwarfed, as by pruning the roots and pinching, and is
grown in a pot or other container and trained to produce a desired shape or
effect.
The
connotations or added/implied Bonsai tree meanings include:
• A
general tree-like shape or style (although not necessarily natural to that type
of plant growing full-size in the wild).
• A
profile that is not as detailed as a photographically-real tree but has just
enough features to easily suggest a full-grown tree.
• Relative
smallness, compared with those same types of trees outside of the container,
for ease of transport and ability to keep nearby.
• A
sense of naturalness which has been subtly accentuated by human intervention
but which is not spoiled by stark evidence of human interaction.
• A
particular representation of something much more than itself, and thus allowing
each viewer to interpret what is shown and to build-upon this based on his or
her own experiences and memories.
• Something
so valued that it has received care for virtually every day of its [hopefully
long] containerized life.
• Something
held in such high regard that it was allowed to be brought temporarily into the
house for honoured guests even though it contained soil from the garden.
• A
portable oasis and transportable miniature garden which can represent the
seasons and vast or favourite landscapes close-at-hand for meditation or
contemplation assistance.
TECHNIQUES OF
MAINTAINING BONSAI FOR LONG
• Leaf trimming (extra
leaves)
• Pruning (trimming
branches and stem)
• Wiring (wiring
branches and trunks)
• Clamping (shaping
trunk and branches with the help of mechanical devices)
• Grafting
(transplanting a new growing material into a prepared area on the trunk or
under the bark)
• Defoliation (naturally
or with the help of chemicals)
• Deadwood bonsai
techniques
CARE OF BONSAI
• Regular Watering as per the type of soil and need of plant
•
Repotting at intervals
• Proper soil composition and fertilization as per the requirement
of plants and soil
• Placement of the bonsai plant as per it requirement of light
STYLES
OF BONSAI
•
Formal
upright (chokkan)
•
Informal
upright (moyogi)
•
Windswept
(fukinagashi)
•
Root-over-rock
(sekijoju)
•
Multi-trunk
styles
•
Forest
or group (yoso ue)
•
Broom
(hokidachi)
•
Cascade
(kengai)
HOW TO MAKE A BONSAI
Choose Your Bonsai Tree
The first step is to choose a tree that will stay little. Yet, it needs to look old and gnarly. The most popular choice is the Japanese juniper but there are other choices including fichus, Chinese elm, dwarf schefflera and the jade bonsai tree. Before making a final decision, think about where your tree will live as some like full sun while others prefer total shade. You can choose to grow your tree indoors or out.
Pick the Right Container
If you choose to grow your tree in a pot, the second step is to choose a container for your tree. You can choose ceramic, stone or rock. Therefore, you need to consider the appearance that you want to create before you make a final choice. Whichever you choose, make sure that it has at least two drainage holes in the bottom. Additionally, choosing a smaller pot will help to keep the tree small.
Prune the Root Structure
The third step is to decide what you would like the tree to look like when it is fully grown. Use string or sturdy wire to shape the tree the way that you would like it to grow. Now, remove the tree from its original pot being careful to keep the root structure attached. Remove the dirt from the roots and trim them so that you have long slender roots that will sit near the soil’s top. Fill your pot with a layer of coarse-grain soil and then add a layer of rich growing medium. Leave a little room at the top so that you can cover the tree’s roots. Place the tree in the pot and carefully cover the roots.
Place in Ideal Conditions
The fourth step is to put the potted tree in its ideal growing condition. If you choose to grow it outside, then you can move it there now. If you are going to grow it inside, then position it so that it gets the right amount of light. Remember that the tree will probably grow toward the light.
Water and Prune the Tree
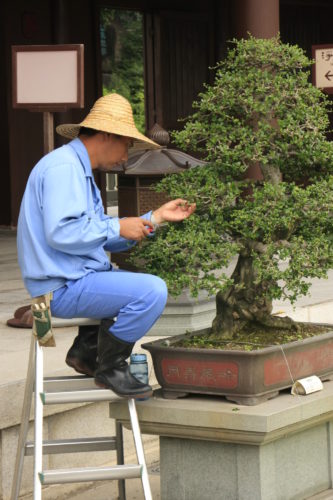
Make sure that the tree gets watered as required for its type. If the tree has leaves, then prune the tree with pruning shears. Alternatively, if you have chosen an evergreen prune the tree by pinching off undesirable pieces. Remove branches growing vertically that are too tough to bend. Also, remove branches that conceal the front of the tree’s trunk. Finally, remove branches that are too thick near the top of the tree.
1. https://youtu.be/rgc2UnxJhNI
2.
https://youtu.be/q7Tv8WMIolU
3.
https://youtu.be/aX6RwN5qx0I
4.
https://youtu.be/SJfpnGEMrKM
5.
https://youtu.be/QYmgrw0PgLU
6.
https://youtu.be/B0DrWAUsNSc
7.
https://youtu.be/2DED2nRPZUQ
8.
https://youtu.be/tyhjuZqjNDI
9.
https://youtu.be/yVQOE9QRAnc
10. https://youtu.be/7DWN_wFw458
(Equipments)
11. https://youtu.be/aRAgJIkKqYk
12. https://youtu.be/lK31eOjWy1A
13. https://youtu.be/8JwLnl-6l_g
14. https://youtu.be/TX_n5n-rn58
(Landscape Types)
15. https://youtu.be/ow_tLNYVzRQ
16. https://youtu.be/638PZqS7H-g
17. https://youtu.be/DS3oyIlOKNs
18. https://youtu.be/e-wO-LqEQb4
19. https://youtu.be/f4HAmuBmJms
20. https://youtu.be/9nDgEFTZUrM
21. https://youtu.be/vvq5zjNwXO4
22. Principles of Landscape Design: https://youtu.be/uRqpaVj-1bk
BONSAI LINKS
1. https://youtu.be/NOiWXaIEVkQ
2.
https://youtu.be/L1FDfwyjkrs
3. https://www.youtube.com/watch?v=vihWettcK_c
4.
https://youtu.be/ZgTmvUHEwwI
5.
https://youtu.be/v_OepcV0T40
6.
https://youtu.be/aV6ysH0H9z8
PPT


Comments
Post a Comment